|
Dashboard and Layers
|   |
|
Dashboard and Layers
| |
Dashboard
Your dashboard is the parent object of the layers you will add to it. Like other objects, you can edit it in the Properties window.
|
DASHBOARD PROPERTY REFERENCE |
|
|
Open Password |
To make your dashboard secure, you can set a password here that will be needed to open your dashboard. |
|
Edit Password |
To make your dashboard secure, you can set a password here that will be needed to edit your dashboard. |
|
Background Color |
If you desire, you can change the background color of your dashboard by clicking inside this box, then clicking the |
For the fastest possible rendering, divide your dashboard into layers (see more information about layers below). The first layer should contain all background objects, or anything that is not dynamically changeable at runtime (like gauge backgrounds and tick marks). The second layer should contain all objects that change, like your needles and text. Because layers are cached, if you group your changing objects all on one layer and leave everything else in the background layer, it will render faster since it only has one layer to draw. To add a layer, right-click Dashboard on your list and go to Add Object, then Add Layer. Layers only fall as child objects directly under the dashboard.
Since each layer has a cache that can potentially be several megabytes in size, you should use containers for grouping and organizing your objects, instead of making several layers to do that job.
A layer is a container that is a direct child object of the dashboard. Layers are used to group objects together. As mentioned above, it is recommended to have two layers for your dashboard: one as the background layer with all shapes that do not change, and one with the needles and values that do change. This is so that DashXL will only need to redraw the changeable layer, making it render faster.
To add a layer, right-click on your dashboard object in the Dashboard Object View window, go to Add Object, then Layer. Since the layer groups the child objects beneath it, anything added under this layer can be moved, stretched, rotated, and made invisible as a group. Here are the properties of a layer that can be changed in the Properties window:
|
LAYERS PROPERTY REFERENCE |
|
|
Offset X |
To move the layer horizontally, enter a value here. To move it to the left, enter a negative value. |
|
Offset Y |
To move the layer vertically, enter a value here. To move it up, enter a negative value. |
|
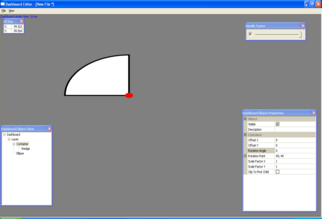
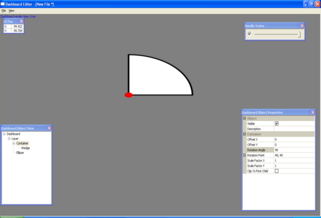
Rotation Angle |
The layer will be rotated around the rotation point the length of degrees you enter as the rotation angle. For example, below is a layer with a pie wedge with a rotation point represented by the red circle, before and after a 90 degree rotation (before at left).
The layer is rotated in a clockwise direction the amount of degrees you enter. For more information, see angles and degrees. |
|
Rotation Point |
This is the point around which the layer is to be rotated. You can either enter in the rotation point coordinates or click the |
|
Scale Factor X |
To horizontally stretch or shrink your container and its child objects, adjust this value. A scale of 2 doubles the width of the objects. A scale of .5 cuts the width in half. |
|
Scale Factor Y |
To vertically stretch or shrink your container and its child objects, adjust this value. A scale of 2 doubles the height of the objects. A scale of .5 cuts the height in half. |
|
Clip to First Child |
You can select and deselect this box to clip it to the container's first child (the first object listed under the container). |