|
Container
|   |
|
Container
| |
Containers are useful for grouping the elements of a gauge together since you can add several child objects to them. Click here for information on adding objects. When you add child objects under your container, you can make the entire group invisible, scale the container, rotate it, and move it by offsetting the X and Y coordinates. In the Properties window, you can change all the objects in a container at once. To change a container (or layer)'s position, scale, visibility, or rotation, make sure it is highlighted in the Dashboard Object View list.
|
PROPERTY REFERENCE |
|
|
Offset X |
To move the container horizontally, enter a value here. To move it to the left, enter a negative value. |
|
Offset Y |
To move the container vertically, enter a value here. To move it up, enter a negative value. |
|
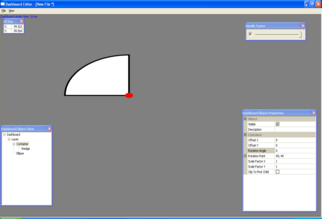
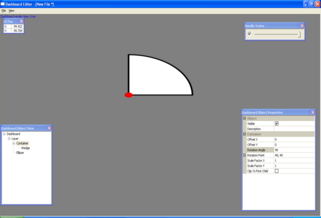
Rotation Angle |
The container will be rotated around the rotation point the amount of degrees you enter as the rotation angle. For example, below is a container with a pie wedge with a rotation point represented by the red circle, before and after a 90 degree rotation (before at left).
The container is rotated in a clockwise direction the amount of degrees you enter. For more information, see angles and degrees. |
|
Rotation Point |
This is the point around which the container is to be rotated. You can either enter in the rotation point coordinates or click the |
|
Scale Factor X |
To horizontally stretch or shrink your container and its child objects, adjust this value. A scale of 2 doubles the width of the objects. A scale of .5 cuts the width in half. |
|
Scale Factor Y |
To vertically stretch or shrink your container and its child objects, adjust this value. A scale of 2 doubles the height of the objects. A scale of .5 cuts the height in half. |
|
Clip to First Child |
You can select and deselect this box to clip it to the container's first child, the first object listed under the container. Clipping allows for an interesting effect, particularly if using it with a needle container. Click here to learn more about clipping. |
It is important to note that when DashXL renders a container's transition, it goes through the values entered in the Properties window from top to bottom.