|
Arcs
|   |
|
Arcs
| |
Arcs make great colorbands on gauges. They are versatile and easy to work with. Like many other objects, arcs use a brush and pen.
The arc can be edited in the properties window with six different values:
|
PROPERTY REFERENCE |
|||
|
Center Point |
This represents where you want the center of the arc to be located. The center point for an arc is the point from which the radii will be calculated (see below). To select a center point, you can either enter in the coordinates (see coordinate system for more information about these coordinates) or you can click the |
||
|
Horizontal Radius |
This length refers to the distance from the center point to the edge of the arc (horizontally). The length of the radius is a percentage of the window. The radius is the length from the center point to the arc. Therefore, the length of the entire arc is twice the length of the radius (from one edge to the center point to the other edge). If, for example, you would like your arc to be half the length of the application window, set your horizontal radius to 25. This means that from one edge of the ellipse to the center is 25%, or 1/4, of the screen. So from one edge to the other it will be 50%, or half, of the screen. |
||
|
Vertical Radius |
This length refers to the distance from the center point to the edge of the arc (vertically). The same rules apply to this radius as the horizontal radius, which is explained above. |
||
|
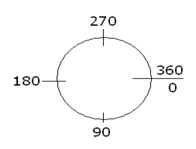
Arc Angle |
|
||
|
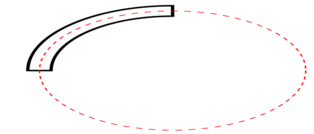
Arc Sweep |
This refers to how long you want the arc to be. 90 is 1/4 of an ellipse. So if you want an arc that is 1/2 of an ellipse, you would enter 180. If you want a smaller arc that is 1/8 of an ellipse you would enter 45. Click here for more information on angles and degrees. |
||
|
Arc Width |
|
||