|
Tick Marks
|   |
|
Tick Marks
| |
Tick marks can be modified in several different ways. The Properties window for the tick marks is divided into three sections: Tick marks, circular ticks, and straight ticks. Tick marks also contain below them a line object and a text object. These objects modify the tick marks and tick labels respectively. The line and text objects under the tick marks are modified the same way as any other line or text object except that the start point and end point for the line, as well as the position for the text, are irrelevant and do not need to be modified.
|
TICK MARKS PROPERTY REFERENCE |
|
|
Type |
Tick marks can be circular for a circular gauge or straight for a bar gauge. Select which type you want to use here. The type you choose here is the section in the properties window you will use to modify. (If you choose Circular, for example, there is no need to modify anything in the Straight Ticks section of the properties window.) |
|
Tick Count |
This represents the number of ticks you want on your gauge. |
|
Skip Tick List |
If you want to skip any ticks, record them here in list form, separating them by commas. Record the order number of the ticks (the first tick being 0), not the value of them. For example, let's say you want to skip the first tick so that neither the text nor the line are drawn. So to skip it you would enter 0. To skip every other tick starting with the first one, you would enter 0,2,4...until you reach the end of your tick count. |
|
Show Tick Labels |
You can check or uncheck this box to turn on or off the labels. |
|
Label Start Range |
Enter the value you would like for the first tick here. |
|
Label End Range |
Enter the value you would like the last tick to show. Once the start and end range for the labels are entered, DashXL will automatically calculate the values for the rest of the ticks. |
|
Label Start Rotation |
For tick labels that are completely vertical, leave the start and end rotation at 0. If you would like them to slant, enter the degrees you want the first tick label to slant on here. For more information about angles and degrees, click here. |
|
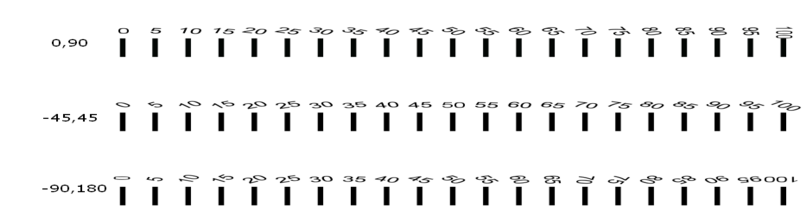
Label End Rotation |
Enter the degrees, if any, you would like the last tick label to slant. Here are some examples of straight and circular ticks with varying label start and end rotations. The first value listed represents the start rotation; the second value is the end rotation.
|
|
CIRCULAR TICKS PROPERTY REFERENCE |
|
|
Direction |
You can specify if you would like the ticks and their labels inside or outside of the circle made by the center point and radii (see below for more information on those values). |
|
Center Point |
This is the where you specify the center point of your tick marks. |
|
Horizontal Radius |
This is the horizontal length from the center point to the edge of where the tick marks and labels will start (if the direction mentioned above is specified outside) or end (if the direction specified is inside). |
|
Vertical Radius |
This is the vertical length from the center point to the edge of where the tick marks and labels will start (if the direction mentioned above is specified outside) or end (if the direction specified is inside). |
|
Angle |
Specify here where along the circle you would like your tick marks to start. See angles and degrees for more information. |
|
Sweep |
This is the sweep, or length around the circle, of the tick marks. See angles and degrees for more information. |
|
Length |
You can adjust the length of the tick mark lines here. |
|
Label Position |
Depending on the direction mentioned above, you can change the label position towards the inside or outside of the circle here, in percentage of the radii specified. If the direction selected is inside, the labels will move towards the center. If the direction is outside, the labels will move away from the center. |
|
STRAIGHT TICKS PROPERTY REFERENCE |
|
|
Direction |
You can change the labels and tick marks to be on the first side or second side of the line made by the start point and end point (see below). |
|
Start Point |
Enter here the coordinates where you want the ticks to start. |
|
End Point |
Enter the coordinates for the point where you want the ticks to end. |
|
Length |
You can change the length of the tick marks here. |
|
Label Position |
Here you can change the location of the tick labels in relation to the invisible line drawn from the start point to the end point. Zero indicates that the labels are on the line, and the higher the position, the further away the labels are from the line. |